How to Get Free Custom Domain For Blogger
Are you looking for a free custom domain for your Blogger blog? Freenom offers you to use free custom domain and it is very simple to set up on your Blogger blog.
Now you can remove the ‘Blogspot’ sub-domain from your blog URL.
Pros and Cons of Custom TLD Domain for Blogger
- It is totally for free. You don’t need to pay any amount.
- Very easy to get free custom domain.
- Instant set up on Blogger .
- Free Domain offer is available only for 12 months. If you want to increase your domain availability you have to upgrade with money and it is approximately $9.95 USD per year. If you want to start your journey for professional, it would be better to purchase TLD domain (.com, .net, .org, .info etc) from Freenom. Because it offers very cheap cost. And you have to set up custom domain for Blogger manually.
- It offers only .tk, .ml, .ga, .cf, .gq extension of domain for free. TLD like .com, .me, .net etc are not available for free.

7 Steps to get a free custom Domain
- Create account on Freenom and verify your email.
- Choose ‘Register a new domain‘ from ‘Services‘
- Insert your domain name and ‘Check availability‘.
- If available check your specific domain and click on ‘Check out‘ option.
- Extend the period to 12 months @ Free from the ‘Period‘ option and next click on ‘Continue‘.
- Check the Terms and condition from the ‘Review & Checkout‘ page.
- Now again go to Services → My Domains option. Here you will see the status and manage domains for your registered domain. If the status be active, you will be eligible to use this domain then.
6 Steps to set up free custom domain in Blogger
Go to Services → My Domains → Manage Domains and choose Manage Freenom DNS from the tab. Here you will get option to add records like A, AAAA, CNAME, MX, LOC, NPTR, TXT etc. But you need to just CNAME. You can add more records by clicking on +More Records.
First insert www to Name field and ghs.google.com to Target field.
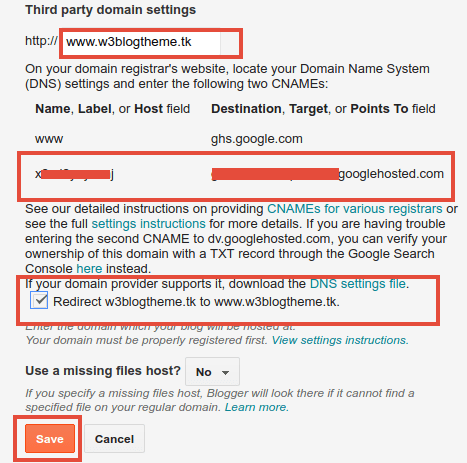
Go to Blogger Dashboard → Settings → Basic and click on ‘Set up a 3rd Party URL for your Blog‘.
Insert your registered domain with www. Example: www.w3blogtheme.tk and check the redirect option. Then click on ‘Save‘ option. You will see some notification with errors showing. But don’t be scary !

Copy the second row first column generated key and paste to Name Field of Freenom CNAME. Similarly copy the second row second column generated key and paste to Target field.
Finaly Save setting from Blogger Dashboard and Freenom DNS settings.
Have you got your free custom domain for your Blogger blog? Share with us.
# Written by Elliyas Ahmed


